Bent Over Barbell Row: How to Do It, Muscles Worked & Form
The bent over barbell row is one of the most effective compound pulling movements for building a thick, strong back. Pulling a loaded barbell from a hinged position forces your lats, traps, and rhomboids to coordinate under real load, while your erector spinae work to keep your torso rigid throughout every rep. If your back is not keeping up with your pressing, this lift closes the gap faster than almost anything else in the gym.
Muscles Worked
The bent over barbell row is a full upper-back movement. The lats are the primary driver, with substantial support from the traps and rhomboids throughout the pull.
- Latissimus Dorsi (Lats): The primary mover. Responsible for driving your elbows back and down and producing the majority of the pulling force.
- Rhomboids: Retract the shoulder blades at the top of the row. High activation throughout the movement.
- Trapezius (Upper, Mid, Lower): Stabilize and retract the shoulder blades; the mid and lower fibers are especially active during the squeeze at the top.
- Rear Deltoids (Posterior Deltoid): Assist with horizontal abduction and keep the shoulder joint centered under load.
- Biceps (Long and Short Head) and Brachialis: Provide elbow flexion throughout the pull, particularly in the later portion of the range.
- Erector Spinae: Isometrically stabilize your torso in the hinged position across every rep of every set.
- Forearm Flexors: Work to maintain your grip on the bar under load, especially in heavier sets.
How to Do the Bent Over Barbell Row
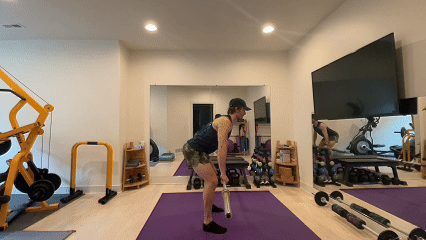
- Stand with your feet shoulder-width apart, toes slightly turned out. Grip the barbell overhand just wider than shoulder-width, hinge at your hips and bend your knees slightly until your torso reaches roughly 45 degrees. Let the bar hang just below knee height and keep your gaze directed toward the floor to hold a neutral spine.
- Before the first pull, draw your shoulder blades down and back to pre-activate your lats, traps, and rhomboids. Brace your core firmly to protect your lower back and keep your glutes engaged for additional stability.
- Drive your elbows back and upward, pulling the bar toward your lower ribcage. Keep your arms close to your torso and your shoulders pulled down throughout the movement. Squeeze your shoulder blades together hard at the top of each rep.
- Lower the bar under control back to full arm extension, keeping your back muscles under tension as you descend. Reset your brace fully before beginning the next rep.
Coaching Cues
- Lead with your elbows, not your hands. Think of your hands as hooks on the bar. The elbows drive the movement; the hands just hold on.
- Row to your belt buckle, not your chest. Pulling to the lower ribcage keeps the lats engaged. Pulling higher shifts the work to the rear delts and upper traps.
- Lock your hips in place. This is a back exercise. If your hips are dipping and rising with each rep, you have gone too heavy.
- Pause for one count at the top. The pause ensures you are completing the shoulder blade retraction and not using momentum to get the bar up.
- Keep your torso angle constant. If it drifts up as the set progresses, strip weight. A rising torso turns a row into a partial deadlift shrug.
Common Mistakes
- Going too heavy and losing position: The most common mistake. Overloaded rows produce a combination of hip extension, upward momentum, and reduced range. Pick a weight that lets you hold your torso angle for every rep.
- Pulling too high: Rowing to your upper chest instead of your lower ribcage reduces lat involvement and puts more stress on the rotator cuff. Keep the contact point lower.
- Letting the torso creep up: When fatigue sets in, the hips tend to rise, turning the hinge into something closer to a Romanian deadlift. Lock the hinge before the set starts and hold it.
- Cutting the range of motion at the bottom: Not fully extending the arms between reps shortens the working range and reduces the stretch on the lats. Lower all the way and feel the stretch.
- Rounding the lower back under load: A rounded lumbar spine in a heavily loaded hinge position is a direct route to injury. Master bracing at lighter weights before adding load.
Sets, Reps & Programming
The bent over barbell row works across a wide range of rep ranges. For strength, 3 to 5 sets of 3 to 6 reps with heavier loads builds raw pulling capacity and pairs well with deadlift training days. For hypertrophy, 3 to 4 sets of 6 to 12 reps at a controlled tempo with a deliberate pause at the top is the most common and effective approach for back thickness. For higher-volume accumulation phases, sets of 12 to 20 reps at a lighter load build work capacity and keep back fatigue manageable. Program it once or twice per week depending on total weekly pulling volume. Because your erector spinae stabilize your torso throughout, avoid placing heavy bent over rows directly after heavy deadlifts in the same session until you have built enough lower back endurance to handle both.
Safety
The primary risk in the bent over row is lower back strain from a rounded spine under load. Always start lighter than you think you need to and spend several warm-up sets dialing in your brace and torso position before moving to working weight. If your lower back is already fatigued from earlier in a session or from the previous day, substitute a supported variation such as a chest-supported row or a seated cable row rather than grinding through compromised reps. Use chalk or straps on heavy sets to keep grip from being the limiting factor, and do not ego-lift: a strict 100-pound row does more for your back than a sloppy 180-pound row does.
Track It in LiftLogic
The bent over barbell row is a compound movement that rewards consistent progressive overload over months, not weeks. Tracking every set, rep, and load lets you spot exactly where your progress has stalled and whether your pull volume is matching your push. LiftLogic logs each session and gives you a clear view of your strength curve over time, so you can adjust before a plateau turns into months of spinning your wheels. Download LiftLogic free on the App Store.