Dumbbell Bench Press: How to Do It, Muscles Worked & Form
The dumbbell bench press is one of the most effective chest exercises in any program. Unlike the barbell version, dumbbells require each arm to stabilize and press independently, which corrects strength imbalances and recruits more secondary stabilizers. The result is a fuller range of motion, better chest development over time, and a safer option for lifters with shoulder issues. If the barbell bench press is the foundation, the dumbbell variation is the tool that fills in the gaps.
Muscles Worked
- Pectoralis Major (Upper and Lower Chest): The primary mover. Both the clavicular (upper) and sternocostal (lower) heads drive the pressing motion, with the sternocostal head contributing the most force at flat bench angles.
- Anterior Deltoid (Front Shoulder): Assists meaningfully throughout the press, particularly at the beginning of the concentric phase.
- Triceps (Long, Lateral, and Medial Heads): Extend the elbow joint through the final portion of the press, accounting for a significant share of the total force output.
- Pectoralis Minor: A small, deep chest muscle that stabilizes the scapula throughout the movement. Often overlooked, but important for shoulder health under load.
How to Do the Dumbbell Bench Press
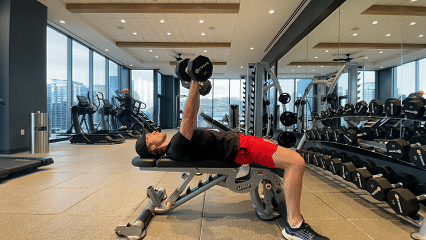
- Sit on the end of a flat bench with a dumbbell resting on each thigh. Lean back and use your legs to kick the dumbbells into position at chest level, one at a time. Lie flat with your feet planted firmly on the floor, slightly wider than hip-width. Your shoulder blades should be retracted and pressed into the bench, with a slight natural arch in your lower back.
- Hold the dumbbells with a pronated grip (palms facing your feet). Position them at chest level with elbows bent to about 90 degrees, elbows slightly below the line of your shoulders. Brace your core and drive your feet into the floor to create full-body tension before pressing.
- Press both dumbbells upward in a smooth, controlled arc, straightening your arms while keeping the weights aligned over your chest. Keep your elbows at a 45 to 75 degree angle from your torso throughout: do not let them flare to 90 degrees. Stop just short of full elbow lockout at the top and squeeze your chest hard at the peak of the movement.
- Slowly lower the dumbbells along the same arc back to chest level, taking 2 to 3 seconds on the descent. Stop just before the dumbbells touch your chest or before your elbows drop below your shoulders. Keep the pecs under tension throughout. Reset your breath and repeat for the desired reps.
Coaching Cues
- Retract before you press. Pull your shoulder blades together and down before the first rep. Hold that position the entire set. This is the foundation that lets the pecs do their job safely.
- Elbows in, not out. Keep a 45 to 75 degree angle from your torso. Elbows at 90 degrees shifts the load away from your pecs and directly onto the shoulder joint under maximum load, which is exactly where you do not want it.
- Press in an arc, not a straight line. The dumbbells travel in a slight arc from your chest upward and slightly inward at the top. This mirrors the anatomical line of the pectoralis major and produces better chest activation.
- Slow the lowering phase. The eccentric (lowering) phase drives most of the adaptation. Control the descent in 2 to 3 seconds. Do not just let gravity do the work.
- Feet drive into the floor. Pressing your feet into the ground creates a full-body tension that stabilizes the bench press from the bottom up. You will immediately move more weight once you practice this.
Common Mistakes
- Flaring elbows to 90 degrees. The most common error. It shifts load from the chest to the shoulder joint and significantly increases injury risk under heavy load. Tuck the elbows toward your hips.
- Losing scapular retraction mid-set. If your shoulder blades wing off the bench as you press, you lose your stable base and the movement becomes a shoulder exercise. Retract and hold all the way through the last rep.
- Locking out at the top. Full lockout dumps tension off the pecs and onto the elbow joints. Stop 5 to 10 degrees short of lockout and keep the chest engaged.
- Dropping the dumbbells fast. A fast, uncontrolled descent wastes the eccentric and invites injury. Slow it down deliberately on every set.
- Using too much weight. With dumbbells, you cannot bail as easily as with a barbell. A weight that breaks your form is a weight that will eventually hurt you. Start lighter than you think you need and build up.
Sets, Reps & Programming
For muscle growth, 3 to 4 sets of 8 to 12 reps at 65 to 75 percent of your estimated max is a solid starting range, with 60 to 90 seconds of rest between sets. For strength, pull the rep range down to 4 to 6 and extend rest periods to 2 to 3 minutes. Beginners can run simple linear progression: start with 3 sets of 10 at a weight that feels controlled for all reps, and add 2 to 5 pounds per dumbbell each session until progress stalls. Program the dumbbell bench press alongside a horizontal pull (like a dumbbell row or cable row) to balance pushing and pulling volume and keep shoulder health in check over the long term.
Safety
Never use a weight you cannot control on the way down. If your form breaks down, your elbows flare, or your shoulder blades lose contact with the bench, the weight is too heavy. At the end of each set, lower the dumbbells to your thighs rather than dropping them: dropping heavy dumbbells is a fast route to shoulder injury and damages equipment. If you feel sharp pain at the front of the shoulder joint during the press, check your elbow angle first. If the pain persists at any angle, try a neutral grip (palms facing each other) which reduces anterior shoulder stress. For very heavy sets, a training partner spotting at the wrists is safer than one spotting at the elbows.
Track It in LiftLogic
Log every set of dumbbell bench press in LiftLogic to track load, reps, and progressive overload across sessions. LiftLogic stores your full PR history, computes estimated one-rep maxes, and shows you when your progress has stalled so you know exactly when to add weight. With the Apple Watch integration, you can log reps and load mid-set without touching your phone. Download LiftLogic free on the App Store.