Standard Lat Pulldown: How to Do It, Muscles Worked & Form
The lat pulldown is one of the most effective and accessible vertical pulling exercises in the gym. If you cannot yet do a pull-up, or you want to add volume to your back training without grinding through bodyweight sets, the lat pulldown gives you the same movement pattern with load that you control. Done correctly, it directly targets the latissimus dorsi (the big wing-shaped muscle across your back), builds meaningful upper-body pulling strength, and creates the foundation to eventually nail unassisted pull-ups. Here is exactly how to do it, what muscles it works, and the mistakes that quietly undermine every set.
Muscles Worked
- Latissimus Dorsi (primary): The main mover. The lats extend and adduct the shoulder joint, pulling the elbows down and back to drive the bar toward your chest.
- Biceps (long and short head): Assist with elbow flexion throughout the pulling range. They contribute meaningfully but should not dominate the movement.
- Teres Major: Works alongside the lats in shoulder extension, adding depth to the upper-back pull.
- Middle Trapezius: Helps retract and depress the shoulder blades at the bottom of the rep, where your back is fully contracted.
- Rhomboids: Stabilize the scapulae during the pull and assist in scapular retraction at full contraction.
- Rear Deltoid: Provides supplementary shoulder extension and horizontal abduction during the pull.
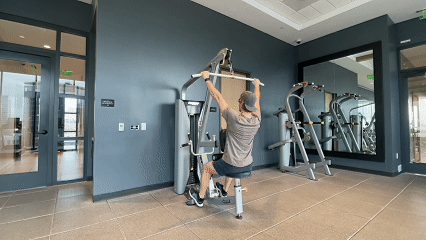
How to Do the Standard Lat Pulldown
- Set up the seat: Sit on the lat pulldown machine facing forward. Adjust the thigh pad so it rests snugly on your thighs to anchor your lower body. Grip the bar with an overhand grip, hands slightly wider than shoulder-width. Sit upright with your chest lifted and lean back slightly at a 10 to 15 degree angle, keeping your feet flat on the floor.
- Engage before you pull: Engage your lats by imagining pulling your shoulder blades down and together toward your spine. Tighten your core to stabilize your torso and prevent unnecessary movement. Relax your arm muscles so the lats handle the majority of the work.
- Pull: Pull the bar down in a controlled motion toward your upper chest. Drive the movement with your elbows, bringing them down and slightly back. Keep your chest lifted and avoid rounding your shoulders. Stop when the bar is just below chin level or lightly touches your upper chest.
- Return under control: Slowly extend your arms to return the bar to the starting position, maintaining tension in your lats throughout the motion. Avoid letting the weight stack slam down or losing control. Keep your body stable and repeat for the desired number of repetitions.
Coaching Cues
- Think elbows, not hands. Initiating with your elbows down and back shifts the work into your lats immediately. Thinking about your hands keeps the load in your forearms and biceps.
- Pull your shoulder blades into your back pockets. This cue fires the lower traps and keeps the shoulder girdle stable rather than letting your shoulders ride up near your ears.
- Chest leads the bar. As you pull, keep your chest tall and lifted. The bar comes to you, not the other way around. Excessive forward lean turns a vertical pull into a row.
- Control the negative. The eccentric (return) phase is where a lot of lat development happens. Resist the weight on the way up over 2 to 3 seconds rather than letting it snap back.
- Keep your core tight. A braced core prevents your lower back from arching aggressively under load. You want a slight natural arch, not a crunch or a hyperextension.
Common Mistakes
- Using momentum: Swinging back to heave the bar down removes the lats from the movement and shifts strain onto your lower back. If you are rocking, the weight is too heavy.
- Pulling behind the neck: Behind-the-neck lat pulldowns place the cervical spine in a vulnerable flexed position with no mechanical benefit. Always pull to the front.
- Letting the shoulder blades shrug upward: If your shoulders rise toward your ears as the bar returns, you are not controlling the eccentric and losing tension in the lats. Actively depress the scapulae throughout the set.
- Over-relying on biceps: If your arms fatigue before your back does, your biceps are driving the pull. Practice the shoulder-blade-down cue before each set and consider using a false (thumbless) grip to reduce forearm involvement.
- Bar pulled too low: Pulling past the upper chest to the sternum or lower does not increase lat activation. It just compromises shoulder joint mechanics. Stop at the collarbone or just above.
Sets, Reps & Programming
The lat pulldown slots easily into a pull day, upper-body day, or any back-focused session. For general strength and hypertrophy, 3 to 4 sets of 8 to 12 reps at a moderate load works well as a primary or secondary back movement. If you are using it to build toward pull-ups, work in higher rep ranges (10 to 15 reps) at a lighter load and prioritize the controlled negative. Advanced trainees can use heavier loads in the 5 to 8 rep range for strength-focused sessions. It pairs naturally with rows (which work the horizontal pull pattern) for complete back development: one vertical pull and one horizontal pull per session covers most of the back musculature effectively.
Safety
The lat pulldown is a low-risk exercise when done with correct form, but a few points are worth noting. Always use the thigh pad properly: it should hold your legs down without pinching. An unsecured pad lets your body lift off the seat under heavy loads, which shifts the exercise from a pull into an ugly full-body jerk. Keep loads conservative enough that you can complete each rep with a controlled negative and without rounding your shoulders forward. If you feel pinching in the front of your shoulder at the bottom of the pull, your shoulders are internally rotating. Cue elbows slightly back and down rather than straight down, and lighten the load until you have the path right. Anyone returning from a shoulder or elbow injury should clear the movement with a physiotherapist before loading up.
Track It in LiftLogic
The lat pulldown is a machine-based exercise, which makes it ideal for tracking progressive overload: the weight stack gives you exact numbers every session. Log the weight, reps, and sets in LiftLogic after each workout and use the built-in progression tracking to see when it is time to add weight or reps. Over several months of consistent tracking, the progress graph tells you more than any generic program ever could. Download LiftLogic free on the App Store.