Standard Plank: How to Do It, Muscles Worked & Form
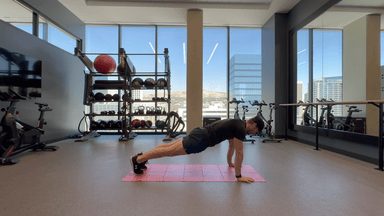
If you have never trained your core before, the standard plank is one of the best places to start. It is also called the high plank, because you hold the top of a push-up position on straight arms, and it needs no equipment, no gym, and no experience. You just hold your body in one straight line and keep it there. That sounds simple, and the setup is, but a good plank is a genuine full-body exercise that teaches your entire midsection to stay strong and steady. Learning it well now pays off later, because the exact same skill of keeping your torso braced is what protects your back when you eventually squat, deadlift, or carry heavy shopping up the stairs. You do not need to be strong to start a plank. You get strong by holding it, a few seconds longer each week.
Muscles Worked
- Rectus abdominis (primary): This is the long sheet of muscle down the front of your stomach, the one people call the six-pack. In a plank it works to stop your lower back from sagging toward the floor, which is the plank's main job.
- Obliques (primary): These run down the sides of your waist. They keep your hips level and stop your body from twisting or tipping to one side while you hold.
- Transverse abdominis (deep core): This is your deepest ab muscle, and it wraps around your middle like a built-in belt. The plank switches it on and teaches it to squeeze and support your spine, something endless crunches never really do.
- Glutes and quads (support): Your bum and the front of your thighs squeeze to keep your hips and legs firm and level, which is what actually stops your hips from drooping.
- Shoulders and chest (support): Because you are up on straight arms, the front of your shoulders and your chest hold up your upper body and keep you steady.
How to Do the Standard Plank
- Start on your hands and knees, then place your hands flat on the floor directly under your shoulders with your fingers spread wide. Step your feet back one at a time until your legs are straight and your body forms one long line from the top of your head to your heels. Set your feet about hip-width apart with your toes pressed into the floor, and do not let your hips sag toward the ground or pike up toward the ceiling.
- Tighten your belly as if you are about to be gently poked in the stomach, and pull your ribs down toward your hips. Squeeze your glutes and thighs so your legs stay firm and your lower back is supported. Push the floor away through your hands so your upper back stays flat and does not sink between your shoulder blades.
- Hold this straight, strong line without letting your hips drop or your back arch. Keep your neck long and relaxed by looking at a spot on the floor just past your hands. Breathe in slow, steady breaths and keep everything squeezed tight for the whole hold.
- When your form starts to slip, lower your knees to the floor gently and under control, keeping your core tight as you come down so your back does not drop suddenly. Rest, reset your straight line and your brace, then hold again for your planned number of holds.
Coaching Cues
- Make a straight line, not a tent. The picture to aim for is a plank of wood: flat and rigid from your head to your heels. If a friend looked at you from the side, they should see a straight line, not a dip at the hips or a peak in the middle.
- Ribs down, hips slightly tucked. Gently pull the bottom of your ribs toward the front of your hips. This little tuck flattens your lower back and is the single cue that turns a lazy hang into a real, hard-working plank.
- Squeeze everything at once. A good plank is not just your stomach. Tighten your abs, your bum, your thighs, and even grip the floor with your hands. When it all works together, the position feels solid instead of shaky.
- Keep breathing. It is tempting to hold your breath, but that just makes you tire faster. Take slow, shallow breaths while keeping your stomach braced, and the hold becomes about your core, not your lungs.
- Stack your shoulders over your hands. Your hands should sit directly under your shoulders, not out in front. This keeps the weight balanced and takes pressure off your shoulder joints and wrists.
Common Mistakes
- Letting the hips sag. This is the most common one. When the hips drift toward the floor, your lower back takes the load instead of your abs, and it can start to ache. If you feel it in your lower back, tuck your hips and squeeze your bum harder.
- Hiking the hips up. Lifting your hips into an upside-down V feels easier because it takes the work off your core. It is no longer really a plank. Drop your hips back down until your body is one flat line.
- Craning your neck up. Looking forward or up kinks your neck and breaks the straight line. Let your head hang naturally in line with your spine and look at the floor just ahead of your hands.
- Chasing the clock. A shaky three-minute plank with your hips sagging does far less than a solid thirty-second plank held tight. Hold a strong position for less time rather than a sloppy one for longer.
- Holding your breath. If you go red in the face and gasp at the end, you were probably holding your breath. Breathe steadily the whole way through so the set ends when your core tires, not when you run out of air.
Sets, Reps & Programming
The plank is measured in seconds held, not reps. If you are brand new, start with 3 holds of 10 to 20 seconds, resting about a minute between each, and keep every second strict and straight. As it gets easier, add five or ten seconds at a time until you can hold a solid 30 to 45 seconds. Once you can comfortably pass about a minute with perfect form, the plank has done its job as a basic hold, and it is time to make it harder rather than longer: try lifting one foot off the floor for a few seconds, reaching one arm forward, or moving on to the forearm plank and side plank. Two or three short sessions a week, tacked onto the end of a workout, is plenty. If a full plank on your toes is too much right now, drop your knees to the floor and hold that version instead. It builds the exact same thing at a level you can handle today.
Safety
The standard plank is one of the safest exercises you can do, and it is very hard to hurt yourself with it. The main thing to watch is your lower back: if your hips sag and you feel pinching or aching in your lower back, stop, reset, and keep your hips a little higher with your abs braced. If your wrists feel sore up on straight arms, you can make fists and balance on a pair of dumbbells, or switch to the forearm plank so you are resting on your forearms instead. Come out of the hold the moment your form falls apart rather than grinding out extra seconds in a collapsed position, because a sloppy plank only teaches sloppy habits. If you are pregnant or returning from a back injury, build up your hold times slowly and keep every rep strict, and check with a professional if anything feels off.
Track It in LiftLogic
Progress on a plank is invisible unless you write it down, because there is no weight on a bar telling you last week was easier. Logging how long you held and which version you used turns a vague "hold as long as you can" into a real exercise you can watch improve week after week. LiftLogic records time-based holds, remembers your best plank, and keeps your core work in the same simple log as the rest of your training so nothing slips through the cracks. That little bit of tracking is often what keeps a nervous beginner coming back, because you can see yourself getting stronger. Download LiftLogic free on the App Store.